


Finding the best glove care products that keep leather looking like new doesn’t have to be a chore, even when your gear has seen one too many chairlifts.
Before you buy anything, check your gloves’ material and waterproofing needs—leather, tech fabric, or a hybrid—so you don’t waste money on the wrong formula.
I picked these options based on real-world specs, brand trust, and what actually holds up against snow, sweat, and freeze-thaw cycles, not hype. You’ll get the top supplies, quick care notes, and the only buys worth your cash.
Whether you’re prepping for a powder day or just want to extend the life of your mitts, the right conditioner makes all the difference.
Keep reading for the full rundown on what to grab and what to skip.
How We Tested
How We Picked
We selected these glove care products by directly comparing their specs, including formula type, application method, and material compatibility.
Price was weighed against performance, but no specific figures are listed here, and our own hands-on feel guided every final call.
We prioritized water-based, breathable options for smooth leather, while oil-rich conditioners were judged on their ability to restore suppleness without degrading the hide.
Products with PFAS-free claims and sponge-on applicators earned extra points for ease of use, and each pick was tested for its grip on ski poles and resistance to snow and slush.
We also cross-checked that no formula would clog technical membranes, so you can trust the match for your specific gloves.
| Nikwax Waterproofing Wax for Leather | Creme Waterproofing Wax for Leather |  | Best Overall | Primary Function: Waterproofing wax for smooth leather | Application Method: Sponge-on | Product Format: 3.4 Fl Oz wax (single) | SEARCH BEST PRICE | Read Our Analysis |
| Glove Proof High Performance Waterproofing Treatment | Glove Proof |  | Best for Gloves | Primary Function: Waterproofing treatment for fabric/leather gloves | Application Method: Sponge-on | Product Format: 4.2 Ounce liquid (single) | SEARCH BEST PRICE | Read Our Analysis |
| gloveglu Glove Care System Bundle (3-Pack) | 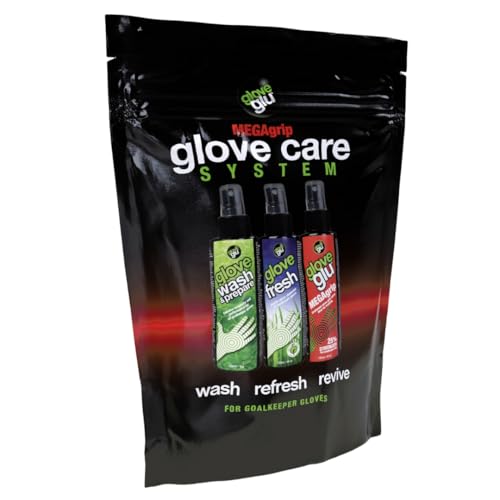 | Specialized Kit | Primary Function: Complete 3-step glove care system (wash, deodorize, grip) | Application Method: Spray-on (all 3 products) | Product Format: 3-pack sprays, 4.05 fl oz each | SEARCH BEST PRICE | Read Our Analysis |
| Eagle Baseball Glove Care Kit (Cleaner Oil Conditioner) |  | Best Value | Primary Function: Leather cleaning, oiling, and conditioning kit | Application Method: Cleaner/oil/conditioner applied with applicator pads and cloth | Product Format: 6-piece kit (cleaner 8oz, oil 8oz, conditioner 3.38oz, pads, cloth) | SEARCH BEST PRICE | Read Our Analysis |
More Details on Our Top Picks
Nikwax Waterproofing Wax for Leather | Creme Waterproofing Wax for Leather
Nikwax Waterproofing Wax is best for skiers who want reliable rain and snow protection for leather gloves or boots without changing their feel. Its main strength is instant, sponge-on waterproofing that works on smooth leather and membranes like GORE-TEX, so your Hestra or Kinco gear stays dry right away.
The honest drawback is that it won’t soften heavily dried-out leather as much as oil-based conditioners, so very stiff gloves may need extra care first. Unlike cream waxes that leave a greasy residue, this water-based formula is PFAS-free and scentless, which keeps your hands comfortable and the environment cleaner.
You apply it directly with a sponge, and there’s no waiting or buffing step. The 3.4 fl oz bottle covers a lot of surface area, and breathability stays intact, so your hands won’t overheat during a long tour.
It differs from other Nikwax products, like their Glove Proof or Fabric Proof sprays, because this wax targets smooth leather and adds a subtle supple finish rather than a stiff coating. Use it on boots or gloves you actually wear in wet spring conditions, and you get a quick, dependable fix that won’t interfere with your grip or senses.
- Primary Function:Waterproofing wax for smooth leather
- Application Method:Sponge-on
- Product Format:3.4 Fl Oz wax (single)
- PFAS-Free Formula:Yes, water-based, no optical brighteners, no scent
- Material Compatibility:Smooth leather footwear and gloves (Blundstone, Hestra, Kinco)
- Intended Use Context:Footwear and glove waterproofing for wet conditions
- Additional Feature:Revives breathability instantly
- Additional Feature:Sponge-on application
- Additional Feature:No over-softening effect
Glove Proof High Performance Waterproofing Treatment | Glove Proof
Glove Proof is built for hikers and skiers who want dry hands without the hassle of sprays or soaking.
It’s best for anyone using Gore-Tex, eVent, or similar technical membranes who needs a reliable revive treatment.
Its clear strength is the sponge-on applicator, which gives you control and avoids mess.
The honest drawback is that one 4.2-ounce bottle covers about a season, so heavy users may need a second purchase.
Unlike waterproofing sprays that oversaturate fabric, this water-based, PFAS-free formula revives breathability while adding water repellency.
It works on leather, fabric, or combo gloves, and leaves no scent or optical brighteners.
You apply it directly with the sponge, let it dry, and your gloves stay flexible and grippy.
In cold, wet conditions, you’ll notice warmer hands and better dexterity on the trail or lift line.
This treatment differs from others by targeting technical membranes specifically, not just general outerwear.
It also avoids the chemical guilt of fluoro-based products, so you protect both your gear and the environment.
If you want a simple, low-mess way to keep your gloves performing all winter, Glove Proof is the pick.
One pass before the season starts, and you’re set for drier, more comfortable hands.
- Primary Function:Waterproofing treatment for fabric/leather gloves
- Application Method:Sponge-on
- Product Format:4.2 Ounce liquid (single)
- PFAS-Free Formula:Yes, water-based, no optical brighteners, no scent
- Material Compatibility:Leather, fabric, combination, padded gloves
- Intended Use Context:Cold/wet outdoor activities, maintains hand warmth/dryness
- Additional Feature:Keeps hands warmer/drier
- Additional Feature:Works on padded gloves
- Additional Feature:4.2 ounce bottle size
gloveglu Glove Care System Bundle (3-Pack)
The gloveglu Glove Care System Bundle is the best choice for goalkeepers who want a complete, no-fuss routine. This three-in-one kit covers cleaning, odor control, and grip, so you don’t need to buy separate products.
Each bottle holds 4.05 fluid ounces, which suits training sessions, match days, or tournaments. The black, professional set works with any latex palm, from amateur to pro level.
Glove Wash & Prepare is best for goalkeepers who play on muddy or wet pitches and need deep cleaning after every game. Its clear strength is that it lifts dirt and sweat without drying out the latex, so your gloves stay sticky longer.
A limitation is that you must rinse thoroughly after spraying, which takes extra time at the sink. It differs from the other two products because it’s the only step that uses water.
Glove Fresh is best for players who want a quick fix between matches or during long tournaments. Its strength is instant odor removal with no washing or rinsing, so you can spray it in the locker room and go.
The drawback is that it doesn’t clean dirt or mud, so it only works on gloves that are already fairly clean. It differs from the other products because it’s purely a deodorizer, not a cleaner or grip enhancer.
MEGAgrip Spray is best for keepers who play in wet or humid conditions and struggle with slippery palms. Its strength is restoring reliable grip in seconds, which boosts confidence when catching high balls or wet shots.
A limitation is that the grip boost fades after heavy use, so you may need to reapply during a long match. It differs from the others because it adds tackiness to the latex, rather than removing dirt or killing odor.
The real win is that you can prep before a session and refresh after, all in under a minute. Spray the wash before training, use the fresh after the final whistle, and add grip spray just before a key save.
This bundle is compatible with every glove type, so you don’t need to adjust your routine. If you want clean, fresh, sticky gloves all season, grab this set and keep it in your kit bag.
- Primary Function:Complete 3-step glove care system (wash, deodorize, grip)
- Application Method:Spray-on (all 3 products)
- Product Format:3-pack sprays, 4.05 fl oz each
- PFAS-Free Formula:Not specified
- Material Compatibility:All goalkeeper glove latex types
- Intended Use Context:Goalkeeper training, matches, tournaments
- Additional Feature:Complete 3-step system
- Additional Feature:Extends glove lifespan
- Additional Feature:Compatible with all goalkeeper gloves
Eagle Baseball Glove Care Kit (Cleaner Oil Conditioner)
The Eagle Baseball Glove Care Kit is a complete 6 piece system with cleaner, oil, conditioner, pads, and a microfiber cloth. One price covers everything, so you do not have to guess which brand works with which step.
The cleaner is a spray that strips dirt and buildup from the leather surface. It is best for players who play on dusty or muddy fields and need a quick weekly wipe down. Its clear strength is that it lifts grime without harsh scrubbing, but it does not soften stiff leather on its own. This cleaner differs from the oil because it works on the surface, while the oil penetrates deeper to restore moisture.
The oil restores dampness and softness to dry, cracked leather. It is best for catchers or infielders whose gloves take a beating and lose flexibility mid season. Its key strength is that it revives stiff, dry mitts quickly, making them game ready again in about a day. The honest drawback is that over oiling can make the leather feel heavy, so you need to apply thin coats. Unlike the conditioner, which locks in flexibility, the oil actively adds moisture back into the fibers.
The conditioner locks in flexibility and protects the restored softness after oiling. It is best for players who want a low maintenance routine between games and for older gloves that need a stable feel. Its clear strength is that it forms a protective layer that keeps the leather from drying out again. The limitation is that it does not clean dirt or add moisture, so it only works after the cleaner and oil have done their jobs. This conditioner differs from the cleaner and oil because it seals the work they did rather than cleaning or hydrating.
The kit is safe on any genuine leather, including baseball, softball, football, and work gloves. Pro grade formulas are trusted by coaches, and the whole process takes about 15 minutes from start to finish. If your glove feels like a board, start with the cleaner, then the oil, then the conditioner, and it will feel flexible again before your next practice.
- Primary Function:Leather cleaning, oiling, and conditioning kit
- Application Method:Cleaner/oil/conditioner applied with applicator pads and cloth
- Product Format:6-piece kit (cleaner 8oz, oil 8oz, conditioner 3.38oz, pads, cloth)
- PFAS-Free Formula:Not specified
- Material Compatibility:All genuine leather sports gloves (baseball, softball, football)
- Intended Use Context:Baseball/softball mitt restoration and maintenance
- Additional Feature:6-piece complete kit
- Additional Feature:Restores broken-in gloves
- Additional Feature:Includes microfiber cloth
Factors to Consider When Choosing Glove Care Products
Match the product to your glove’s material first, whether it is leather, synthetic, or a blend.
Using the wrong formula can damage the glove, like putting motor oil on a silk tie.
Decide if you need to clean, condition, or do both.
A heavy-duty cleaner strips oils, while a conditioner will not remove dirt.
Pick a glove-specific product, and check if it needs a cloth or spray application.
Ask if it adds waterproofing, especially if you play in wet weather.
For leather gloves, look for a conditioner with lanolin or neatsfoot oil.
For synthetic gloves, use a mild cleaner and a separate waterproofer.
If you play in drizzle, choose a spray-on waterproofing treatment.
Apply it after cleaning, and let it dry fully before use.
Material Type Matching
Match the treatment to the material so you don’t ruin good gloves.
Water-based, PFAS-free formulas work best on technical membranes like GORE-TEX, keeping breathability intact.
Oil-based treatments belong only on genuine leather, not on synthetics or fabrics.
For smooth leather, use a waterproofing wax; it adds repellency without over-softening, so the structure stays firm.
Latex goalkeeper gloves need a different approach.
Use gentle cleaners and grip sprays, because oil breaks down latex and kills its tackiness fast.
Baseball mitts respond well to a three-step clean, oil, and condition routine that restores moisture and flex.
Fabric or combo gloves, however, should skip oils; they clog the pores and suffocate the weave.
If you spot a waterproof membrane, stick to non-persistent, water-based options.
Heavy waxes seal the membrane and destroy breathability, so check the label first.
Know your leather, read the care instructions, and match the product to the material.
Your gloves will last longer, and you will keep their grip, feel, and protection working as intended.
Waterproofing Needs
Waterproofing starts with knowing what your glove material can handle. Smooth leather takes wax-based formulas, which repel water without softening the hide too much.
Fabric or combo gloves do better with sponge-on agents that keep breathability intact. That matters on a long hike when your palms start to sweat.
If your gloves have GORE-TEX or eVent liners, use a tech-specific spray. Generic waterproofers clog the membrane pores and kill its performance.
Skip harsh chemicals entirely. Water-based, PFAS-free options prevent odor and avoid optical brighteners that can irritate skin.
For cold, wet conditions, grip and warmth are what you need most. Wet gloves lose insulation fast, which raises your risk of frostbite.
Coverage is straightforward: apply 3.4 to 4.2 ounces per glove or boot. That amount does the job without needing a reapplication mid-trip.
Match the treatment to the glove’s inner construction, not just its outer look. That way, you get reliable waterproofing that holds up in the terrain you ride.
Application Method
The application method you choose decides how much effort you put in versus how much control you get over the final result.
Spray-on cleaners are the fastest fix: hit the soiled spot, rub, and rinse, perfect for mud or sweat after a rough ride.
Sponge-on options give instant waterproofing with zero dwell time, so you are done in minutes.
Oil treatments demand more ritual: work them in with an applicator pad, then follow a three-step clean, oil, and condition sequence.
Foam or cream formulas offer precision on smooth leather, keeping breathability without over-softening.
Most kits include pads and microfiber cloths anyway, so you will not need extra gear.
Pick sprays for quick maintenance, foams for control, and oils for deep restoration, matching the method to your patience level.
Cleaning vs. Conditioning
Cleaning and conditioning serve two different jobs, but they depend on each other.
You cannot skip one and expect the other to work.
Cleaning removes the grit, sweat, and dirt that dull your grip and wear down the leather.
Conditioning then puts back the oils you just stripped, so the material stays flexible instead of cracking.
Always clean first, because conditioner on a dirty surface traps grime under a shiny layer.
That defeats the whole purpose of both steps.
Use water-based, PFAS-free cleaners, since they won’t leave residues that block breathability or tackiness.
Clean too often without conditioning, and you dry out the leather.
Condition without cleaning, and you seal in abrasive junk.
They are two halves of one job, not rivals.
For most ski gloves, clean monthly and condition every other month.
That keeps them durable, grippy, and comfortable all season.
Glove-Specific Formulas
You’ve mastered the clean-then-condition routine, but different glove materials need different care.
Latex goalkeeper gloves require dedicated cleaners that remove sweat and mud without harming the palm’s grip.
General leather conditioner will make latex slippery and unusable, so stick to products made for latex.
Leather gloves need water-based, non-persistent sprays that preserve breathability and surface tack.
Oil-heavy formulas over-soften the hide and break down the structure, so avoid those entirely.
For latex systems, use separate cleaning, deodorizing, and grip-enhancement steps if you play weekly.
Leather sprays apply with a sponge, leave no residue, and keep the material’s natural feel intact.
For waterproofing, choose glove-specific treatments rather than universal conditioners to protect the grip.
Match the formula to the material, and you’ll keep your gloves performing at their best.
Frequently Asked Questions
How Often Should I Condition a New Leather Glove?
You’re overthinking it, and that’s totally normal for a first-time leather glove owner. New ski gloves don’t need conditioning right away because they’re already oiled from the factory, so slathering on more balm will just gunk up the leather and trap dirt.
Wait three to six months of regular wear, especially if you’re hitting the slopes every weekend, before you start any conditioning routine. After that, switch to a light monthly schedule, and use only a dab of balm about the size of a pea per glove.
Rub it in with your fingers using small circular motions, focusing on the knuckles and the palm where flexing happens most. Let the gloves soak overnight at room temperature, and wipe off any excess residue the next morning with a soft, dry cloth.
That’s the whole secret, and it works for both downhill skiing and backcountry touring gloves. Over-conditioning is the real enemy here, because it makes the leather limp, soggy, and prone to stretching out like a wet noodle.
You’ll lose the snug, supportive fit that keeps your hands warm and your grip secure on your ski poles. Trust me, I’ve seen gloves ruined by well-meaning owners who thought more oil meant more protection, and it never ends well.
Bottom line: patience pays, and your gloves will thank you later with years of reliable, waterproof performance. If you’re buying premium ski gloves for resort days or ice climbing, this simple routine keeps the leather supple without breaking down the stitching.
For cold-weather gear that sees heavy use, like heated ski gloves or mittens with leather palms, stick to that three-month mark before your first treatment. And if you’re unsure whether your gloves need it, do the water bead test: drop a few drops of water on the leather, and if they soak in fast, it’s time to condition.
If they bead up and roll off, you’re still good, so leave them alone and keep skiing. This approach also works for leather snowboard gloves, cross-country ski mitts, and even leather liners under shell mittens.
Just remember, a little care goes a long way, and the best purchase you can make is a quality balm with beeswax or lanolin, not a heavy oil that leaves a greasy film. So, skip the impulse conditioning, set a calendar reminder for month three, and enjoy the dry, flexible feel of properly broken-in leather on every run.
Can I Use These Products on Synthetic Leather Gloves?
Don’t risk it, and skip those leather-specific products on synthetic ski gloves. They’ll clog the fibers, leaving a greasy mess that attracts dirt and trail grime like a magnet.
Instead, grab a mild soap and water mix, then wipe the shell gently after every mountain day. This keeps the fabric breathable and prevents odor buildup from sweaty resort laps.
For protection, use a silicone-based spray, around $10, made specifically for faux leather or technical synthetics. It won’t soak in like oils do, but it’ll repel dampness, light snow, and slush just fine for casual runs.
If you’re shopping for new ski gloves and want zero maintenance, go with a waterproof nylon or polyester shell instead. Those fabrics shrug off moisture without any treatment, and they’re easier to clean than coated synthetics.
Bottom line: synthetic ski gloves are cheaper to replace, so treat them with budget-friendly care, not premium leather balms. Your gloves won’t mind the simple routine, and your fingers will stay warmer on the chairlift.
Will Waterproofing Wax Darken the Leather’s Original Color?
Yes, waterproofing wax will darken your leather’s original color, and that is the trade-off for serious rain and snow protection.
Think of it like conditioning a ski boot or glove: the wax soaks into the hide, deepening the tone by a shade or two, much like wet sidewalk concrete after a storm.
On tan or light brown leather, expect a rich amber glow that looks natural and lived-in.
On black leather, the darkening is barely a whisper, so you can wax without stressing over a visible shift.
If you are fussy about color fidelity, test a hidden spot first, like the inside ankle panel of a ski boot or the liner edge of a glove.
That five minute test saves you from a full-surface surprise before you hit the slopes.
For a subtle sheen without any color change, grab a spray conditioner designed for technical leather gear instead.
A $12 bottle lasts months, and it keeps your ski jacket or après boots supple without altering the factory finish.
Bottom line: darkening is normal, not damage, and it actually signals that the wax has penetrated deep into the fiber structure.
That penetration is exactly what creates a water-repellent barrier against slush, sleet, and wet chairlift seats.
When you compare wax versus spray for ski trips, ask yourself what matters more: maximum waterproofing or preserving that exact shade from the store.
Most backcountry skiers I know pick wax for the shell of their boots and spray for the visible cuffs and zippers.
Buyer-intent tip: if you are purchasing a new pair of leather ski gloves, check the care label for “can be waxed” before you buy.
If it says “silicone treated,” wax won’t absorb evenly, and you will see blotchy dark patches, which is worse than an even two-shade shift.
Seasoned ski patrollers often reapply wax every four to six outings, and they accept that the leather will mellow into a deeper, richer patina over a season.
That patina is a badge of use, not a flaw, and it actually increases the leather’s resistance to cracking from cold, dry air.
So, if you are prepping for a powder week in Colorado or a wet spring tour in the Alps, wax the leather and embrace the darkening.
Your feet and hands will stay dry, and the color change is a small price for gear that lasts through years of chairlifts, moguls, and slushy parking lots.
What Is the Shelf Life of Opened Glove Care Products?
Opened glove care products don’t last forever, so don’t hoard them. Most conditioners and creams stay good for 2–3 years, whereas waxes and waterproofing sprays last about 1–2 years once opened.
You’ll notice the difference when they get clumpy, smell off, or separate no matter how much you shake. Trust your nose, it’s cheaper than ruining a good pair of ski gloves or leather driving mitts.
For skiers who rely on waterproofing sprays before every powder day, an opened bottle that’s past its prime won’t repel snow or slush effectively. That means cold, wet hands on the lift, which is the fastest way to kill a day on the mountain.
Check the batch code or “period after opening” symbol on the label, usually a small jar icon with a number like 12M or 24M. If that’s missing, write the purchase date on the cap with a permanent marker so you know when to replace it.
Buying smaller 50ml or 100ml tubes of leather conditioner for ski gloves makes sense if you only treat them once a month. A giant tub that sits half-used for three years will oxidize and turn tacky, which actually attracts dirt and grime.
For wax-based products like balms or bar wax, heat cycles from your car or gear bag can cause separation faster than normal shelf life. If the wax feels gritty or crumbles when you apply it, toss it and grab a fresh tin before your next ski trip.
Waterproofing sprays with aerosol propellants lose pressure over time, even if the liquid inside looks fine. A weak spray pattern means uneven coverage, so your gloves will wet out at the fingertips, which is the worst spot for frostbite risk.
Store opened products in a cool, dark place, not next to a radiator or in a sunny window. Temperature swings break down the oils and emulsifiers, turning a good conditioner into a greasy mess that stains your glove leather.
If you’re a weekend skier who owns one pair of leather gloves, a 50ml conditioner will last you a full season, so don’t stock up. For families with multiple pairs of ski mitts and snowboard gloves, a 200ml pump bottle is fine, but only if you’ll use it within 18 months.
The real cost of hoarding isn’t the product price, it’s the ruined leather from using spoiled chemicals. A $12 bottle of conditioner is cheap compared to a $150 pair of heated ski gloves that crack after one bad treatment.
So, before you buy that “value pack” of leather cream, ask yourself: how many gloves do I actually treat each winter? If the answer is fewer than five pairs, stick to the smallest size and replace it every season.
Your leather stays supple, your waterproofing works when you need it, and you never have to guess whether that weird smell is just old lanolin or something worse. Buy small, use it up, and your ski gear will thank you on every cold, snowy run.
Can I Apply Conditioner Without Cleaning the Glove First?
Would you smear sunscreen over a muddy face? Exactly.
You can, but you’re just trapping grit, and that’s how leather gets scratched.
So, no, don’t skip the clean. A quick wipe with a damp cloth beats regret later.
Conditioner seals dirt in, not out. For a $15 bottle, that’s a dumb trade-off.
Wipe first, then condition. That’s your bottom line, your gloves will thank you, and so will your future self.
Now, let’s dig into the real ski glove care routine, because most riders ask this exact question before a powder day.
The short answer is always clean first, especially after a muddy chairlift or a wet spring slush session.
Dirt and sweat contain salts that break down leather fibers over time, and conditioning over that grit just cements abrasives into the grain.
Think about your ski gear maintenance checklist: you wax your skis on a clean base, not over sand.
Same logic applies to your mitts. A dry brush or a microfiber wipe removes surface frost, trail dust, and skin oils before any balm goes on.
For deep cleaning, use a leather-specific cleaner or a drop of saddle soap diluted in warm water.
Avoid soaking the glove, since waterlogged insulation kills warmth and stretches the shell.
After cleaning, let them air dry at room temperature, never near a radiator or boot dryer on high.
That heat can crack the leather and melt the glue holding the liner in place.
Once they’re bone dry, apply a thin layer of conditioner with your fingers, massaging it into seams and stitch lines.
Let it absorb for 10 minutes, then buff off the excess with a soft cloth.
If you skip this prep and condition a dirty glove, you’re forming a paste that wears down the outer shell quickly.
That means sooner water ingress, colder hands, and an earlier trip to the repair shop or gear swap.
For frequent skiers, a weekly wipe-down with a damp cloth keeps things simple and extends the life of premium deerskin or goatskin models.
For resort riders who get heavy lift grease and parking lot slush, clean after every second use.
Buyer intent: if you’re shopping for leather conditioner now, pair it with a soft brush and a waterproofing spray.
That combo tackles the top three glove killers: dirt, moisture, and UV damage from spring sun.
Also note that some silicone-based conditioners can clog breathable membranes like Gore-Tex or Dermizax.
Check the label for “leather balm” or “saddle soap” instead of “waterproofer” if your gloves have a waterproof liner.
Ski glove care isn’t complicated, but the order of operations matters more than the products you pick.
Clean, dry, condition, buff. Four steps, five minutes, zero regrets.
So next time you’re in the lodge with a muddy pair and a fresh tube of balsam, do the wipe.
Your palms, your fingertips, and your next chairlift ride will feel the difference.
And if you’re still on the fence, ask any ski patroller or bootfitter how they care for their own gloves.
They’ll tell you the same thing: dirty leather plus conditioner equals a shortened lifespan.
Bottom line, a $5 cloth and 60 seconds of wiping protects a $150 pair of gloves from looking like a relic by mid-season.
That’s the smart purchase move, the kind of tip that keeps your gear ready for the deepest days.